
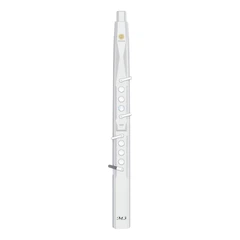


The flexibility of fingering is a crucial aspect in learning the electric saxophone. It directly impacts a player's ability to execute musical passages with speed, accuracy, and expressiveness. This article will explore various effective methods and strategies to enhance fingering flexibility for those learning the electric saxophone.
I. Understanding the Basics of Electric Saxophone Fingering
A. Fingering System
The electric saxophone typically uses a similar fingering system to the traditional saxophone. It consists of keys that are pressed by the fingers to produce different notes. The main keys include the finger keys for covering the tone holes and the thumb key for additional control. Understanding the correct finger placement on each key and the relationship between different key combinations and the resulting pitches is fundamental.
For example, the basic scale fingering starts from the lowest note and progresses up through the different finger positions. Learning these initial fingerings accurately forms the foundation for more advanced playing.
B. Importance of Proper Posture and Hand Position
Posture
Maintaining a correct posture while playing the electric saxophone is essential for efficient fingering. The player should stand or sit upright with the shoulders relaxed and the instrument held in a comfortable position. This allows for free movement of the arms and hands, which is crucial for smooth fingering. If the posture is incorrect, it can lead to tension in the body, which will ultimately affect the finger's ability to move quickly and accurately.
Hand Position
The hands should be placed in a natural and relaxed position on the instrument. The fingers should curve slightly and rest lightly on the keys. The thumb should be positioned comfortably on the thumb rest to provide support and balance. A proper hand position enables the fingers to move independently and with ease, reducing the risk of misfiring or pressing multiple keys accidentally.
II. Exercises for Developing Finger Dexterity
A. Scale Exercises
Regular Scales
Practicing all major and minor scales on the electric saxophone is a fundamental exercise for improving fingering flexibility. Start with slow tempos and gradually increase the speed as the fingers become more comfortable and accurate. Focus on maintaining a smooth and even tone throughout the scale. For example, practice the C major scale, ascending and descending, paying attention to the finger transitions between each note. This helps in strengthening the finger muscles and improving their coordination.
Chromatic Scales
Chromatic scales are excellent for developing finger dexterity as they require the fingers to move in a sequential and rapid manner. Play the chromatic scale starting from a low note and going up to the highest note within the instrument's range and then back down. This exercise challenges the fingers to quickly adjust to different positions and helps in improving their accuracy and speed. It also trains the ear to recognize the subtle differences in pitch, which is beneficial for intonation.
B. Arpeggio Exercises
Major and Minor Arpeggios
Arpeggios involve playing the notes of a chord in a sequential order. Practice major and minor arpeggios on the electric saxophone, starting with simple triads and gradually progressing to more complex chords. This exercise not only improves finger flexibility but also enhances the player's understanding of harmony. For instance, practice the C major arpeggio (C - E - G) in different rhythms and tempos. The fingers need to move quickly and accurately between the three notes, and this repeated practice helps in developing the muscle memory and coordination required for flexible fingering.
Seventh Chord Arpeggios
Incorporating seventh chord arpeggios into the practice routine further challenges the fingers. Seventh chords add an additional note to the basic triad, making the finger patterns more complex. For example, practice the G7 arpeggio (G - B - D - F) and experiment with different inversions. This helps in expanding the finger's range of motion and improving their ability to handle more intricate chord structures, which are commonly encountered in various musical styles.
C. Finger Independence Exercises
Single Finger Exercises
Isolate each finger and practice moving it independently while keeping the other fingers still. Start with simple movements like pressing and releasing a single key repeatedly with one finger. Then progress to more complex patterns, such as playing a short sequence of notes using only one finger while the rest of the fingers remain in a resting position. This exercise helps in strengthening each finger individually and improving its control and independence.
Interrupted Scale Exercises
Play a scale, but intermittently leave out one or more fingers to focus on the movement and independence of the remaining fingers. For example, play the C major scale, but every few notes, lift a specific finger and then quickly replace it to continue the scale. This forces the fingers to adapt to different combinations and movements, enhancing their overall flexibility and coordination.
III. Incorporating Technique and Speed Building Exercises
A. Alternate Fingerings
Learning and Applying Alternate Fingerings
Explore and learn alternate fingerings for different notes on the electric saxophone. Some notes can be played using multiple finger combinations, and using the appropriate alternate fingering can improve the speed and smoothness of playing. For example, in certain passages, using an alternate fingering for a particular note may allow for a more seamless transition to the next note, reducing the time required for finger movement. Practice incorporating these alternate fingerings into your playing, starting with simple melodies and gradually applying them to more complex pieces.
Comparing and Selecting the Best Fingerings
Experiment with different alternate fingerings in different musical contexts to determine which ones work best for a particular passage or style of playing. Sometimes, the choice of fingering may depend on the tempo, the surrounding notes, or the musical expression desired. By comparing and selecting the most suitable fingerings, you can optimize your playing and enhance the overall flexibility and fluidity of your fingering.
B. Speed Exercises
Tonguing and Finger Coordination Exercises
Combine tonguing techniques with finger movements to improve speed. Start with simple exercises like playing short, staccato notes using a single finger and a consistent tonguing pattern (e.g., single tonguing - "tu"). Gradually increase the complexity by adding more fingers and playing longer sequences of notes. This exercise helps in synchronizing the tongue and fingers, which is essential for fast and accurate playing.
Incremental Speed Building
Select a musical passage or exercise that challenges your current speed limit. Start by playing it at a slow and comfortable tempo, then gradually increase the speed in small increments over time. Use a metronome to maintain a consistent rhythm and ensure that the quality of your fingering and tone does not deteriorate as the speed increases. This incremental approach allows the fingers to gradually adapt to faster movements and builds the muscle memory required for high-speed playing.
IV. Using Technology and Tools to Aid in Fingering Flexibility Training
A. Metronome
Setting a Consistent Tempo
A metronome is an invaluable tool for improving fingering flexibility. Use it to set a consistent tempo for your practice sessions. Start with a slow tempo and gradually increase it as you become more proficient. Playing with a metronome helps in developing a sense of rhythm and timing, ensuring that your finger movements are precise and in sync with the beat. It also forces you to maintain a steady pace, which is crucial for improving speed and accuracy.
Metronome Exercises for Flexibility
Perform exercises such as playing scales or arpeggios with the metronome, starting at a slow tempo and gradually increasing the speed in increments. You can also use the metronome to practice rhythmic variations, such as playing triplets or sixteenth notes evenly. This challenges the fingers to adapt to different rhythms and speeds, enhancing their flexibility and coordination. Additionally, try playing along with a metronome that has a built-in click track or rhythm patterns to add more variety to your practice and simulate playing in a musical context.
B. Practice Apps and Software
Interactive Fingering Exercises
There are several practice apps and software available specifically designed for learning and improving saxophone fingering. These apps often offer interactive fingering exercises, games, and tutorials that can make the learning process more engaging and fun. For example, some apps may have virtual saxophone interfaces where you can practice fingering patterns and receive immediate feedback on your accuracy. They may also include features like progress tracking, personalized practice plans, and access to a library of musical pieces for you to practice your fingering skills.
Video Analysis Tools
Some advanced practice software comes with video analysis tools. You can record your playing and then use the software to analyze your fingering technique. It can help you identify any incorrect finger placements, uneven movements, or areas where you need to improve your speed and flexibility. By visually seeing your own playing, you can make more targeted adjustments and improvements. Additionally, these tools may allow you to compare your playing with professional examples or reference videos, providing further inspiration and guidance for improving your fingering.
C. Recording and Self-Assessment
Recording Your Practice Sessions
Regularly record your practice sessions on the electric saxophone. This allows you to listen back to your playing and analyze your fingering from a different perspective. You can identify any areas where the fingering sounds uneven, there are hesitations or mistakes, or the tone quality is affected due to improper finger movements. Recording also helps you track your progress over time and see how your fingering flexibility has improved.
Comparing with Reference Recordings
Find high-quality reference recordings of professional saxophone players playing similar pieces or exercises. Compare your recordings with these references to identify areas where you can improve. Notice the difference in the speed, smoothness, and accuracy of their fingering and try to emulate those qualities in your own playing. This can provide valuable insights and inspiration for further improving your fingering flexibility and overall playing technique.
V. Maintaining Consistency and Patience in Practice
A. Creating a Regular Practice Schedule
Dedicated Practice Time
Set aside dedicated time each day for practicing the electric saxophone and improving your fingering flexibility. Consistency is key, and even short practice sessions on a regular basis can lead to significant improvements over time. For example, aim for at least 30 minutes to an hour of focused practice each day, divided into different sections such as warm-up, exercises, and playing actual pieces.
Structured Practice Plan
Develop a structured practice plan that includes a variety of exercises and techniques for improving fingering flexibility. Incorporate different types of scales, arpeggios, finger independence exercises, and speed building exercises into your routine. Also, make sure to include some time for playing actual musical pieces to apply what you have learned in a more practical context. Rotate through different exercises and pieces regularly to keep your practice interesting and challenging.
B. Overcoming Plateaus and Staying Motivated
Recognizing and Addressing Plateaus
During the learning process, you may encounter plateaus where your progress in improving fingering flexibility seems to slow down or 停滞. When this happens, it's important to analyze your practice routine and identify any potential issues. Maybe you need to change up your exercises, focus on a specific area that needs more work, or seek additional guidance or feedback. Don't get discouraged by plateaus; instead, see them as an opportunity to reassess and make adjustments to your learning approach.
Finding Motivation and Inspiration
Staying motivated is essential for long-term progress in learning the electric saxophone. Find sources of motivation and inspiration, such as listening to great saxophone players, attending concerts or music festivals, or participating in saxophone communities and forums. Set goals for yourself, whether it's learning a new piece, improving your speed by a certain amount, or achieving a better tone quality. Celebrate your small achievements along the way to keep yourself motivated and engaged in the learning process.
In conclusion, improving the flexibility of fingering in learning the electric saxophone requires a combination of understanding the basics, regular practice of specific exercises, incorporating appropriate techniques, using helpful tools and technology, and maintaining consistency and patience. By following these strategies and putting in the effort, you can gradually enhance your fingering flexibility, enabling you to play the electric saxophone with greater speed, accuracy, and expressiveness. Remember that learning any musical instrument is a journey, and with dedication and perseverance, you will see continuous improvement in your fingering skills and overall musical abilities. So, keep practicing, stay motivated, and enjoy the process of mastering the electric saxophone's fingering flexibility.
SUNRISE MELODY M1 Electronic Wind Instrument
. Revisit the passion and dreams of youth
. M1 electric clarinet wind instrument -- The good news for beginners
. Rich and diverse timbres
. Powerful functions and easy operation
. Perfect after-sales service


